How To Cross-Stitch - Beginner Style!
So you've got all your materials and tools at the ready, you've found a pattern that you adore and must stitch up and you're sitting down in a comfy chair, ready to go.
Now what?

Table Of Contents For Lesson 2
Join me in learning how to cross-stitch. It's not hard - I promise!
Reading a pattern
Any good, paid pattern ought to have the following things:
- A gridded representation of the full cross-stitch broken down into a bunch of squares (or triangles too, if it has fractional stitches). Each square is a different colour and will have a unique symbol on it.
- A pattern key, which will tell you the thread numbers/names and the brand of thread recommended to complete the cross-stitch.
- Any other details that need to be known before you get started, such as finished piece size based on the fabric count used or if things like french knots or backstitching are required.
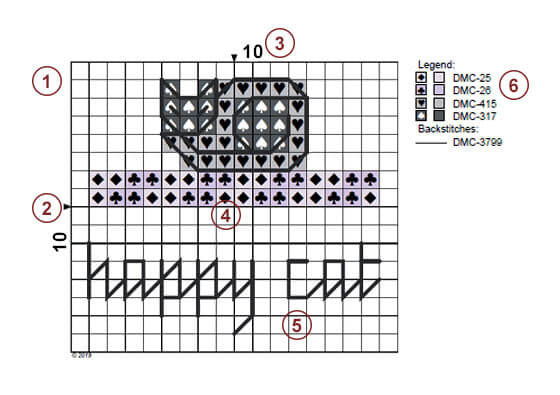
A breakdown of patterns bought from Two Little Kits:
- Every pattern is represented with coloured squares on a grid
- On both the X and Y axis, a triangle will indicate the centre of the pattern
- Numbers in 10s are on both X and Y axis to help you find where you're at
- Colours and symbols (in either black or white depending on the colour) represent each thread colour to use and marry up to the legend
- Backstitches are indicated in a thick coloured line, with the colour indicating which floss to use
- The legend tells you which DMC floss to use for which colour/symbol combination, as well as backstitches and sometimes even french knots.
Setting up the fabric & thread
First, before you want to start stitching, you will want to find the centre of your fabric.
To do this, fold your cut of fabric into half, then half again. This is the easiest way to find the middle. I use a water-soluble marker to dot the middle (you'll frequently see blue or white dots on my fabric - this is my way of gridding the Aida cloth so I know where I am in the design) but you can easily use a 2nd needle or a scrap piece of thread to mark this.
If you're using scrap thread or a water/heat soluble pen (NB:Do not use a regular pen or pencil! These may not come out when you wash your piece!), I recommend marking out a 10x10 grid on your fabric, to match the pattern you're going to cross-stitch.
Once you're happy with setting up your fabric, grab a cut of thread (the length of your forearm is a good length to begin with if you're unsure how much to cut off) and take out as many strands of the thread you are going to work with.
The easiest way to remove each strand of floss is to pinch all 6 in one hand, fan out the strands and slide them out, one at a time. If you try and pull them out like you're peeling a banana, you will find they knot up and it'll be a nightmare to separate them.
Once you've got the right number of strands of floss, thread your needle, flip the fabric over and anchor your floss to the backside of the Aida.

To do this, run your needle through the back-half of the little columns (so if you were to turn the fabric over to the front, you won't be able to see the needle) and pull it almost all the way through. The reason I don't recommend tying a knot to anchor your thread is it will give your finished piece unsightly lumps and bumps (which is very noticeable when framing a piece), knots can come undone which could ruin your finished piece and knots could slip out through the natural gaps in the fabric which -again- could ruin the finished piece.


Making a cross
The order a cross-stitch -on its own- is done, can be followed with this graphic or video demo.

- Bring your needle through to the front at 1
- Go back in at 2
- Come back up at 3
- Complete the cross at 4. That's it!
Direction
You may have seen people's work-in-progress (also known as WIP for short) where they are working left-to-right, then seen someone else working right-to-left. Maybe someone is working from the bottom up but you want to stitch top to bottom? This is all normal! It all comes down to personal preference, on which direction you cross-stitch in.
Personally, I stitch Danish style, left-to-right, top-to-bottom. I do this for two reasons; I grew up in the western world ( Australia) where we read L-to-R, so that feels most natural to me. I work top-to-bottom again, because of how I read but also because this is how my mum taught me to cross-stitch in the first place.
As you can see from the example, this is left-to-right. If there were more lines of the same colour in this area on the pattern, I would have started higher and worked my way down.

Important tip:
One thing I cannot stress enough; whichever way you decide to go, make sure the top stitch for every single cross in your piece is going in the same direction. Your final piece will look messy and amateurish otherwise.
Danish vs English
I can hear you asking "How can there be so many different ways to cross-stitch?". It's a valid question! It -of course- boils down to personal preference again. With a touch of technique to achieve a certain look in one case.
There are different benefits for both methods of course, but here's an example of both styles:
Danish way of cross-stitching.


English way of cross-stitching.


Danish method
The Danish method of cross-stitching is;
- Good for creating large blocks of the same colour in one go
- If you're used to sewing or embroidery, where you don't work with the back of the fabric much, this is an ideal way to stitch
- You work in either columns or rows and start each cross in one direction, turn around and complete the other half of the cross in the opposite direction
English method
However, the English way of cross-stitching;
- Great for single, random dots of colours on their own
- Ideal if you are working on a pattern that uses variegated or coloris floss, to make sure the front and backstitches of the cross are a very similar colour and the colour changes in the floss look more natural
- The best way to lead you up to do other ways of cross-stitching such as parking, or assists you (if you find you unpick often due to miscounting) when undoing sections, since you don't need to unpick whole sections just to fix one stitch
Whichever way you decide to cross-stitch, make sure the top stitch for every single cross in your piece is going in the same direction. Your final piece will look messy and amateurish otherwise.
Wrap up
Congratulations! You've started on the path to learning a relaxing, screen-free, portable, validating and fun hobby!
Once you've gone through the motions of anchoring your thread a few times, found the most comfortable way to stitch and do trial and error with centring your patterns on the cut of fabric, it'll become easier each time. Trust me!